....To the Ring Lord post...http://annespaperplace.blogspot.com/2012/09/the-ringlord.html
Ha! I'll have you know there are now a total of 4 Halloween bracelets in existence now. My original, one I made as a gift for my friend Ann Flick, and I actually SOLD 2 of them for $30 each. How about that?
And, I'll digress with you into my next nutty adventure that I could not pass up. (Damn Pinterest all to hell...) I'll confess I've been a bit of a secret fan of Hello Kitty for a while now. I know, I know, but before you judge me, follow the link below to ORCA Tactical.com and you'll see just how cool Kitty is. I bought 5-6 of these little patches. I'm not quite sure what I'll do with them yet, but she was just too bad-ass to pass up. I'm holding out for the Hello Kitty Iron Man patch which is out of stock right now. I guess that means I'm not the only one who thinks Kitty is bad-ass.
http://www.orcatactical.com/store/search.aspx?searchterms=Hello+Kitty
Showing posts with label Halloween. Show all posts
Showing posts with label Halloween. Show all posts
Wednesday, October 17, 2012


Tuesday, October 16, 2012
Halloween 2012 - Part 2
They are Trick-Or-Treating the Saturday before the holiday this year so I needed to snap-to on getting the treats packed up for the kids. True to a paper crafter's nature, I throw nothing away. I have this bin full of Halloween themed scraps and trinkets from over the years. Yes, there's one for Christmas and Valentine's too... from this I can whip up tags for the treat boxes.

 Then come the stickers, trinkets, ribbons and what-have-you. Before you know it, there are a pile of finished tags and a smaller pile of trinkets and trash. The mom's like these too. They add them to their own scrap book pages. They make good bookmarks, although, since each has a pin on it suitable for pinning to your backpack, you'd have to take that off before using it as a bookmark.

Happy Halloween! - AMK

This pile of stuff transforms to backgrounds first. I save the negative images from my die cuts too. They always add interest to otherwise plain backgrounds.


Happy Halloween! - AMK
Sunday, October 14, 2012
Halloween 2012 - Part 1
It's a rainy day here and I'm lovin' it. It's a rare Sunday I get all to myself. And, left to my own devices, into the craft cave I go!
Fresh from the latest stamp show in Milwaukee, this wonderful lady packed up her Etsy store and brought it to the show. No matter what I do, for some reason I can't get this picture to rotate correctly but here's a shot of some of her Halloween collection and a link to her store. The cat's ass is too funny, and may wind up on the back of a whole lot of cards in the next little while. Her prices are reasonable and if you order from her Etsy store, she sends you a little freebie. At least she did for me.
http://www.etsy.com/shop/pictureshow?ref=seller_info

Next up is what I'd call a CAS (clean and simple) Halloween card. I know, hard to believe from me, right? I used a die cut from Die-Versions that fills a 5x7 card nicely. Hang it on a full moon cut from velum and add your favorite witches hat stamped in orange and clear embossed for some shine. The bling possibly takes it out of the CAS category, but come on...what could you possibly have against some bling?

The entry is all set up for Halloween, got that done before the rain this weekend. Fingers crossed the lighting does not short out before Trick-or-Treat. There's Pye right on queue. She'll sit there all through tick or treat waiting for kids to come to the door. And, of course my reflection...no photo shop skills to remove it. The spider's name is Steve. Kids have asked, and I was not prepared so named him on the spot. Now when they come they pat him on the head and say "Hi Steve!"


Happy Sunday, everyone. - AMK
http://www.etsy.com/shop/pictureshow?ref=seller_info

Next up is what I'd call a CAS (clean and simple) Halloween card. I know, hard to believe from me, right? I used a die cut from Die-Versions that fills a 5x7 card nicely. Hang it on a full moon cut from velum and add your favorite witches hat stamped in orange and clear embossed for some shine. The bling possibly takes it out of the CAS category, but come on...what could you possibly have against some bling?

The entry is all set up for Halloween, got that done before the rain this weekend. Fingers crossed the lighting does not short out before Trick-or-Treat. There's Pye right on queue. She'll sit there all through tick or treat waiting for kids to come to the door. And, of course my reflection...no photo shop skills to remove it. The spider's name is Steve. Kids have asked, and I was not prepared so named him on the spot. Now when they come they pat him on the head and say "Hi Steve!"


Happy Sunday, everyone. - AMK
Wednesday, September 12, 2012
The Ringlord...
In my last post I alluded to some things I'd been doing over the summer that I have not yet shared. Before I share this little project there's a back story that goes with it...
Two years ago, while making the Death By Chocolate cookie book, I found myself in need of a LOT of jump rings. I needed to build paper Death ornaments and was using jump rings to connect the bones of his skeleton together. (I know, what the hell (pun intended) was I thinking, right?)
In my search, I found myself on The Ringlord's website. Yes, that's what he calls himself. You too can go there, www.theringlord.com , will take you right to his online shop. His craft is making chain maille. Yes, you read that right. All you 'King Richard's Fair' knights of the round table wanna-Be's, take note. He sells everything you need to make ANYTHING you want out of tiny metal jump rings, any color, any metal, any size. It's jump ring Nirvana. I swear.
I have, to this day, no idea what came over me. I bought what I needed, to be sure, and then oh-so- very-much more. It's a sickness. I fully admit it. I definitely need a support group. When the box arrived I was aghast at what I had ordered. I didn't stop at jump rings, oh no. Not only did I buy a bag of every color ring, I added the matching color in SCALES too. Why not, right? Kill me.
OK - fast forward to a couple weeks ago when the Oriental Trading catalog showed up showcasing all the fun Halloween lamp work beads. Add to that the boredom of working 3rd shift and we have a perfect storm.
The good thing in all of this is I finally cracked my box from The Ring Lord, added in the stuff I got from Oriental, broke all my nails and scratched quite a few links before I got the hang of it, but....

TA DA! The Halloween Charm bracelet is born. The chain maille weave I used to build the chain is called a Full Persian. It made the chunky chain I was looking for to support all these beads. I've got Franken-finger beads, bats, eyeballs, candy corn, mummys, crystals, and a host of seed beads and rounds that I've had in the arsenal for a long, long time. The small jump rings that attach the charms are all lime green. The chain is made from a mixture of purple and black rings.
It's hard to take a picture one handed. I tried to get a shot or two of the weave. I added in some silicone rings for stretch at the back of the bracelet. I'm not sure I like them. I may take them out and add a clasp. But for now...what do you think? Would you wear it? I know I will...but that's me!


And, before you ask, yes, there will also be a Chistmas version in the making. Can't wait to see the lamp work beads they have for Christmas! And, let's not forget all those scales...still have not found a use for those things.
Somebody help me. Please? :)
Happy crafting! - AMK
Two years ago, while making the Death By Chocolate cookie book, I found myself in need of a LOT of jump rings. I needed to build paper Death ornaments and was using jump rings to connect the bones of his skeleton together. (I know, what the hell (pun intended) was I thinking, right?)
In my search, I found myself on The Ringlord's website. Yes, that's what he calls himself. You too can go there, www.theringlord.com , will take you right to his online shop. His craft is making chain maille. Yes, you read that right. All you 'King Richard's Fair' knights of the round table wanna-Be's, take note. He sells everything you need to make ANYTHING you want out of tiny metal jump rings, any color, any metal, any size. It's jump ring Nirvana. I swear.
I have, to this day, no idea what came over me. I bought what I needed, to be sure, and then oh-so- very-much more. It's a sickness. I fully admit it. I definitely need a support group. When the box arrived I was aghast at what I had ordered. I didn't stop at jump rings, oh no. Not only did I buy a bag of every color ring, I added the matching color in SCALES too. Why not, right? Kill me.
OK - fast forward to a couple weeks ago when the Oriental Trading catalog showed up showcasing all the fun Halloween lamp work beads. Add to that the boredom of working 3rd shift and we have a perfect storm.
The good thing in all of this is I finally cracked my box from The Ring Lord, added in the stuff I got from Oriental, broke all my nails and scratched quite a few links before I got the hang of it, but....

TA DA! The Halloween Charm bracelet is born. The chain maille weave I used to build the chain is called a Full Persian. It made the chunky chain I was looking for to support all these beads. I've got Franken-finger beads, bats, eyeballs, candy corn, mummys, crystals, and a host of seed beads and rounds that I've had in the arsenal for a long, long time. The small jump rings that attach the charms are all lime green. The chain is made from a mixture of purple and black rings.
It's hard to take a picture one handed. I tried to get a shot or two of the weave. I added in some silicone rings for stretch at the back of the bracelet. I'm not sure I like them. I may take them out and add a clasp. But for now...what do you think? Would you wear it? I know I will...but that's me!


And, before you ask, yes, there will also be a Chistmas version in the making. Can't wait to see the lamp work beads they have for Christmas! And, let's not forget all those scales...still have not found a use for those things.
Somebody help me. Please? :)
Happy crafting! - AMK
Thursday, October 13, 2011
This one's my Favorite of the bunch...
After I get all done with something like the Halloween cards, inevitably I have my favorites. This year it's the one you see below. There's two shots of the same card to illustrate something I do to keep things marginally unique. They don't all have to be exactly the same, you know. Experimenting is good! (sorry about the color on the second one - it kind of washed out, but you get the idea)
There is something about that Giant Eyeball from Inkadinkado that just makes me laugh. It is definitely a keeper. I already have another idea on how to use it in my head. Not sure if I should wait till next year or just make it now. Hmmmm...
I pared the eyeball with paper from Reminisce (Halloween Night) and Basic Grey (Erie collection - Tombstone). And, yes, there's another one of those Christmas stamps that just works perfectly for Halloween as well. Anybody out there own their own copy of the Nightmare Before Christmas? That's the first time I realized how alike the two holidays really are. Tim Burton is genius.
To get the shine you simply emboss the eyeball with clear embossing powder after stamping with black pigment ink. The shine on the background swirl is Ranger glossy accents, again. I do like that stuff. I used it on the eyes of the jack-o-lanterns in the background and on some of the dots as well, just to add a little interest and keep the eye moving.
Happy Halloween everyone! Enjoy - AMK


There is something about that Giant Eyeball from Inkadinkado that just makes me laugh. It is definitely a keeper. I already have another idea on how to use it in my head. Not sure if I should wait till next year or just make it now. Hmmmm...
I pared the eyeball with paper from Reminisce (Halloween Night) and Basic Grey (Erie collection - Tombstone). And, yes, there's another one of those Christmas stamps that just works perfectly for Halloween as well. Anybody out there own their own copy of the Nightmare Before Christmas? That's the first time I realized how alike the two holidays really are. Tim Burton is genius.
To get the shine you simply emboss the eyeball with clear embossing powder after stamping with black pigment ink. The shine on the background swirl is Ranger glossy accents, again. I do like that stuff. I used it on the eyes of the jack-o-lanterns in the background and on some of the dots as well, just to add a little interest and keep the eye moving.
Happy Halloween everyone! Enjoy - AMK


Sunday, October 2, 2011
Embrace the Voices In your Head
People always ask me how I come up with all these ideas. All I can say is I've made friends with the voices in my head. Yeah, it sounds a bit like I've been cuttin' the Prozac in half against Dr's orders, but I don't know how else to say it. That thing that twangs inside our brains when we come upon something that makes us happy is what I listen for. When I hear it, I pay attention.
I wander the world of paper crafting waiting to hear something speak to me. I don't know what I'll do with a certain thing when I come across it, it just speaks to me so I add it to my collection knowing that some day, it will become part of a larger thing, that has a voice all it's own. There are ideas in my head all the time. When they get too loud, I HAVE to get them out.
I'm continuing to plow though those piles of organized Halloween chaos I showed you in an earlier post. Here are four more samples that have made it from pile to produced. There is one more in play at the moment and I think 6 or 7 more piles left up there.
These are two that illustrate a similar theme. I really wanted to get the haunted house in there among the spooky trees, but the proportions were all wrong. Separating them worked out pretty cool too.
That's a Spellbinders nesting die circle that I ran through the Cuttlebug spider web embossing folder and then inked with some lime green pastel chalk ink. The trees are a Quickutz die (now known as LifeStyle Crafts). The haunted house is part of a stamp set from Close to My Heart that I colored with Prisma Color markers. I was able to do one of my favorite things, re-purpose a stamp meant for, in this case Christmas, as a Halloween stamp. "not a creature was stirring" works well for Halloween, don't you think? I accented the eyes in the trees and the windows on the house with some Ranger Glossy Accents. If you have not tried that stuff yet, get some. It's a great way to add shine without curling the paper, and it dries relatively fast.

These two are my obligatory attempts at Halloween romance. One is quite dark, and one is perky. Guess which one I like better?...Gah! Although the darker one does not really say much, if there's ribbon on it, then it's romantic as far as I'm concerned. The perky one has bats and a big purple heart cut from Sizzix Original and Bigz dies. The sentiment on the perky one was done on my computer last year. Yes, this is one that stayed as a pile in a box for a full year because I didn't get to it last year.

If you have any questions about any of the products used or techniques, shout them out. I have all the details, but sometimes spelling it all out can get a little boring for you to read. If you want any of these as a full blown class, or even a mini class - I can do that too. Shout out, is all you need do.
I know the comments section on the blog has a mind of its own. But Anonymous works well. If you use Name/URL, that works well to. You can use your FB page for your URL if you aren't nutty enough to have your own blog.
Enjoy! - AMK
I wander the world of paper crafting waiting to hear something speak to me. I don't know what I'll do with a certain thing when I come across it, it just speaks to me so I add it to my collection knowing that some day, it will become part of a larger thing, that has a voice all it's own. There are ideas in my head all the time. When they get too loud, I HAVE to get them out.
I'm continuing to plow though those piles of organized Halloween chaos I showed you in an earlier post. Here are four more samples that have made it from pile to produced. There is one more in play at the moment and I think 6 or 7 more piles left up there.
These are two that illustrate a similar theme. I really wanted to get the haunted house in there among the spooky trees, but the proportions were all wrong. Separating them worked out pretty cool too.
That's a Spellbinders nesting die circle that I ran through the Cuttlebug spider web embossing folder and then inked with some lime green pastel chalk ink. The trees are a Quickutz die (now known as LifeStyle Crafts). The haunted house is part of a stamp set from Close to My Heart that I colored with Prisma Color markers. I was able to do one of my favorite things, re-purpose a stamp meant for, in this case Christmas, as a Halloween stamp. "not a creature was stirring" works well for Halloween, don't you think? I accented the eyes in the trees and the windows on the house with some Ranger Glossy Accents. If you have not tried that stuff yet, get some. It's a great way to add shine without curling the paper, and it dries relatively fast.

These two are my obligatory attempts at Halloween romance. One is quite dark, and one is perky. Guess which one I like better?...Gah! Although the darker one does not really say much, if there's ribbon on it, then it's romantic as far as I'm concerned. The perky one has bats and a big purple heart cut from Sizzix Original and Bigz dies. The sentiment on the perky one was done on my computer last year. Yes, this is one that stayed as a pile in a box for a full year because I didn't get to it last year.

If you have any questions about any of the products used or techniques, shout them out. I have all the details, but sometimes spelling it all out can get a little boring for you to read. If you want any of these as a full blown class, or even a mini class - I can do that too. Shout out, is all you need do.
I know the comments section on the blog has a mind of its own. But Anonymous works well. If you use Name/URL, that works well to. You can use your FB page for your URL if you aren't nutty enough to have your own blog.
Enjoy! - AMK
Sunday, September 25, 2011
Coolest of Cats Card Class - Mini
In response to Andrea who lamented not having any of the products from the previous card class, I created this card with an eye for easy substitution. It's a mini class, which is my way of saying the construction of the thing is pretty straight-forward.
Hey - how about this? If you send me a pic of your version of this card, I'll post it here for everyone to see. amking1964@gmail.com will get it to me. It will be fun to see your interpretation of it.
First - here is a picture of the supplies I used:
Background paper - Reminisce, Midnight Stripe (I bet the designer has a cat named Midnight)
Cat Stamps - These are two images from a company called Prickly Pear. I picked up these little guys at the One of a Kind Rubber Stamp and Scrapbook show in Madison last year. The Saturday before Thanksgiving, folks. Mark your calendars.
Circles Stamp - that's Tim Holtz, he's got an embossing folder that matches it if you really dig it.
Embossing Powder - ZING by American Crafts - Orange, this stuff is glittered. (Andrea's favorite medium)
Staz-On - Jet Black
Sentiment - sorry - the manufacturer is not labeled on this one, it's really easy to use your printer though, (wink, wink!)
Orange Brads - these two here are swirl brads in two colors of orange. They came in a glass tube that was prone to rolling off the table and breaking on the floor, hence I don't have the original packaging to tell you who made them.


Hey - how about this? If you send me a pic of your version of this card, I'll post it here for everyone to see. amking1964@gmail.com will get it to me. It will be fun to see your interpretation of it.
First - here is a picture of the supplies I used:
Background paper - Reminisce, Midnight Stripe (I bet the designer has a cat named Midnight)
Cat Stamps - These are two images from a company called Prickly Pear. I picked up these little guys at the One of a Kind Rubber Stamp and Scrapbook show in Madison last year. The Saturday before Thanksgiving, folks. Mark your calendars.
Circles Stamp - that's Tim Holtz, he's got an embossing folder that matches it if you really dig it.
Embossing Powder - ZING by American Crafts - Orange, this stuff is glittered. (Andrea's favorite medium)
Staz-On - Jet Black
Sentiment - sorry - the manufacturer is not labeled on this one, it's really easy to use your printer though, (wink, wink!)
Orange Brads - these two here are swirl brads in two colors of orange. They came in a glass tube that was prone to rolling off the table and breaking on the floor, hence I don't have the original packaging to tell you who made them.

The finished card is #10, that's 4x9.25. It will fit nicely into a #10 business envelope. Take your supplies and work your magic and make them look like what you see below. Note that I stamped two sets of circles, embossed them and then cut them out. Stamp everything on the scraps from your cream colored card stock.

When you're all done putting it together, it should look something like this. That's it. Like I said, a mini card class.

Let me know what you think and send me your versions! Enjoy - AMK
Saturday, September 24, 2011
Halloween Card Class - a rainy afternoon project
It's Saturday here in Cedarburg and man, is it raining. Dennis Diebold must have washed is wife Lynn's car again...He tells me that's the surest way to make it rain. To while away the afternoon I put this little card together. It's one of those piles you saw on the floor in a previous Halloween post. Hopefully the pictures will make things clear.

First - we have to give credit where credit is due: Here are the tools you'll need:
Sizzix Strip Die - Bats;
EK Success punch - Drops;
Sizzix Tim Holtz Alterations embossing folder - Halloween Words;
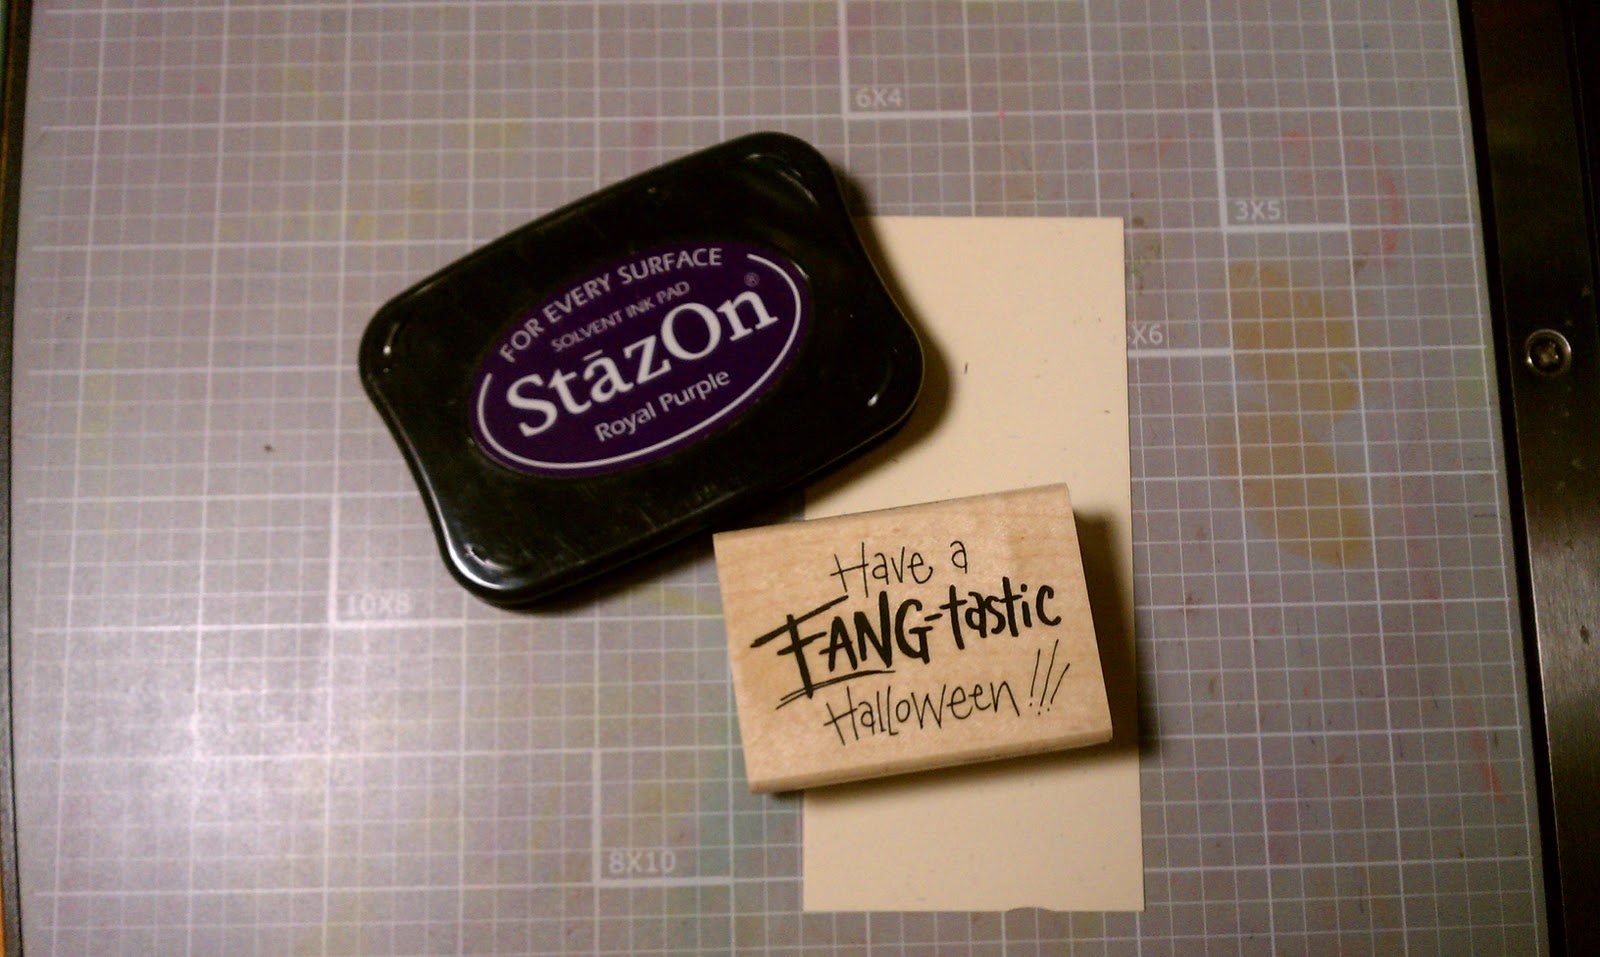
Stampendous H258 - Fang-tastic
Staz-On - Royal Purple
Versa Mark - Grape (not pictured)
Colorbox Re-Inker - Lava Black (not pictured)
Small rubber brayer
Pallet board
Background paper is from Cosmo Crickit, Haunted collection - Macabre
Transparency Film
White, beige, orange, purple, black card stock scraps
Die Cutting Machine - I use the Big Shot. It's my workhorse.

The finished card is A7 - that's 5x7. The embossing folder is A2 - that's 4.25 x 5.5. So trim your papers accordingly.
Ok - Let's get started. If you click on the finished card to embiggen it, you will see the transparency overlay over the words. This adds to the interest of the card and makes people say - 'How'd you do that?'
Well - here's how:
Cut your transparency film to fit the folder. There are two definate sides to this stuff. The rough side is meant to take the ink. So always use that side down.

Dribble a little Lava Black ink onto a pallet board and roll it around with the brayer until you get a nice even smudge.
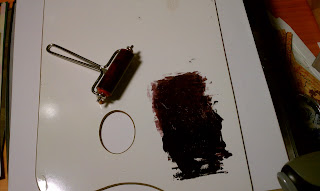
Open the embossing folder and roll the ink onto the back panel with the brayer. Don't think to much about this or you will go crazy. You are working with a transparency and that means everything is in reverse. Lay the film inside the folder with the rough side down and roll it through your die cutting machine.


Next, cut a piece of white card stock the same size as the transparency, lay it into the emobssing folder and run it through. Don't worry about cleaning the folder. The ink, remember, will be on the back side of the white card stock, so you won't see it.
Load the brayer with ink again, and roll it onto the front of the white embossed card.

Layer the transparency over the card stock and attach using a few strategically placed mini-glue dots.

Ink the stamp with royal purple and stamp onto beige card stock scrap, trim close to image, edge with grape ink, and matt with first orange and then purple. Don't use white for this image. You want those fangs to pop, so they should be the only white element to the card.

Ok - if your hands are not clean, go wash them. We want these fangs to be a nice bright white. I had to toss my first set because my fingers were full of ink. Punch out two sets of the fangs using the Drops punch. Make sure your paper does not have an obvious texture as that's usually only on one side. You'll be turning one of the sets over to get the shapes you need for this.

Die cut one of the smaller bats from the strip die using a black scrap. Now you have all your pieces, so let's assemble the card.
I liked the background paper so wanted to show more of it rather than less. Attach the embossed panel to the card as shown and trim off the pieces that don't fit on the front. Layer on the stamped image. Pop up the fangs and the bat with some foam squares. Ink the outer edge of the card with grape ink. Stay away from the transparency with the grape. The front of the transparency will not take the ink and you'll just get it all over your fingers. If you want to add a purple edge to the transparency, you'll have to do it with the Staz-On.

That's It! Hope this was all clear. If you get confused, post a commnt. I'll respond in kind.
Enjoy! - AMK

First - we have to give credit where credit is due: Here are the tools you'll need:
Sizzix Strip Die - Bats;
EK Success punch - Drops;
Sizzix Tim Holtz Alterations embossing folder - Halloween Words;
Stampendous H258 - Fang-tastic
Staz-On - Royal Purple
Versa Mark - Grape (not pictured)
Colorbox Re-Inker - Lava Black (not pictured)
Small rubber brayer
Pallet board
Background paper is from Cosmo Crickit, Haunted collection - Macabre
Transparency Film
White, beige, orange, purple, black card stock scraps
Die Cutting Machine - I use the Big Shot. It's my workhorse.

Ok - Let's get started. If you click on the finished card to embiggen it, you will see the transparency overlay over the words. This adds to the interest of the card and makes people say - 'How'd you do that?'
Well - here's how:
Cut your transparency film to fit the folder. There are two definate sides to this stuff. The rough side is meant to take the ink. So always use that side down.

Dribble a little Lava Black ink onto a pallet board and roll it around with the brayer until you get a nice even smudge.


Load the brayer with ink again, and roll it onto the front of the white embossed card.

Layer the transparency over the card stock and attach using a few strategically placed mini-glue dots.

Ink the stamp with royal purple and stamp onto beige card stock scrap, trim close to image, edge with grape ink, and matt with first orange and then purple. Don't use white for this image. You want those fangs to pop, so they should be the only white element to the card.
Ok - if your hands are not clean, go wash them. We want these fangs to be a nice bright white. I had to toss my first set because my fingers were full of ink. Punch out two sets of the fangs using the Drops punch. Make sure your paper does not have an obvious texture as that's usually only on one side. You'll be turning one of the sets over to get the shapes you need for this.

Die cut one of the smaller bats from the strip die using a black scrap. Now you have all your pieces, so let's assemble the card.
I liked the background paper so wanted to show more of it rather than less. Attach the embossed panel to the card as shown and trim off the pieces that don't fit on the front. Layer on the stamped image. Pop up the fangs and the bat with some foam squares. Ink the outer edge of the card with grape ink. Stay away from the transparency with the grape. The front of the transparency will not take the ink and you'll just get it all over your fingers. If you want to add a purple edge to the transparency, you'll have to do it with the Staz-On.

That's It! Hope this was all clear. If you get confused, post a commnt. I'll respond in kind.
Enjoy! - AMK
Wednesday, September 21, 2011
A creative process - Halloween 101
Pictured below is the start of my Halloween card creative process. I started by cleaning the room. Let's face it, it needed a good cleaning. Everytime I do that, more stuff winds up in the rummage sale pile. Fine by me. Out with the old, in with the new! And, yes, there is new stuff arriving every day. Someday soon I will blog about all the sites I like to buy from and my thoughts about each.
I should note that everything you see layed out on the floor below is all from my historical arsenal of Halloween stuff. None of it is new this year. Oh, wait. I take that back, the Unlucky 13 set is one of those Unity sets I spoke about in my last post. But that's it. I really wanted to use up all this stuff before I started restocking. Fingers crossed, I think this year will do the trick.
The theme of each card is usually the first thing I settle on. For example, if someone says, 'I've got my eye on you'; put that in a Halloween context and what comes to mind? Exactly! Creapy eyeballs glowing in field of blackness, right? Now all I have to do is find the right images, paper and embellishments to make it real. That's how I got to the 13 piles of soon to be cards you see below.
I'll make multiples of each style until the paper is used up. One goes in the shoebox to pull out when magazines put out a call. One goes in the 'My Work' acid free storage box for posterity. All the others are either sold or sent.
Is this how you do it? I'm curious to find out how other creative minds work.
Enjoy! - AMK

I should note that everything you see layed out on the floor below is all from my historical arsenal of Halloween stuff. None of it is new this year. Oh, wait. I take that back, the Unlucky 13 set is one of those Unity sets I spoke about in my last post. But that's it. I really wanted to use up all this stuff before I started restocking. Fingers crossed, I think this year will do the trick.
The theme of each card is usually the first thing I settle on. For example, if someone says, 'I've got my eye on you'; put that in a Halloween context and what comes to mind? Exactly! Creapy eyeballs glowing in field of blackness, right? Now all I have to do is find the right images, paper and embellishments to make it real. That's how I got to the 13 piles of soon to be cards you see below.
I'll make multiples of each style until the paper is used up. One goes in the shoebox to pull out when magazines put out a call. One goes in the 'My Work' acid free storage box for posterity. All the others are either sold or sent.
Is this how you do it? I'm curious to find out how other creative minds work.
Enjoy! - AMK

Subscribe to:
Posts (Atom)