Wednesday, December 6, 2023

Pocket Full of Miracles - Christmas Cards

It's December once again.  I finished the cookie books early this year.  A Miricale unto itself.  I took a look around the craft cave and decided it's just not working for me anymore in its current state, so I spent a little money and a lot of time and overhauled the whole damn thing.  I'll go through all that in a separate post.  But once it was done, this little Christmas pocket/card thingy jumped out as needing to be created and sent out.  Try as I might, it's not in the mail in time for St. Nick's day.  It kind of reminds me of the little things you'd put in a stocking.  

Everyone gets a unique holiday bookmark made from scraps cast off from many varied different projects over the years.  I've sent them out before, so it's not a new thing, but if you are like me, I lose them all the time.  It's fun to come across them, usually in a cookbook for me, months later.  That's the first thing. 

Next, is a clip art candy cane that I found on my computer earlier in the year when I replaced it with a new and faster model.  I love this candy cane image.  I even used it in the cookie book this year.  New in the craft cave, a Brother Scan and Cut allows me to print or stamp any image I want, and then cut it out with or without a border.  I can also cut out the shadow offset you see in blue.  However, I fussy cut those blue backgrounds this year as I had a ton of smaller scraps that worked, so rather than fuss with loading one scrap after another into the Scan and Cut, the old-fashioned hand work was much easier and faster.  Goes to show that technology has its place, but it can't do everything.  

Thirdly - I included a hand stamped holiday wish tag.  This tag was inspired by Heidi Swapp, who, if you found her on FB, you'd see her creating lovely cards and tags all starting with a blank.  She creates and sells stamp kits and class videos that you can buy and watch to create your own unique piece of stamped art.  Well, I'm sorry Heidi, but your price point is too high for your stamps, and with the embarrassingly large amount I already own, I think I can piece together something just as cool as yours.  But thank you for the 30 seconds of video you show that inspired me to give it a try.  

The last thing is the pocket itself. Now, I know we live in a digital world, but if anyone is still using the old-fashioned paper Planner, I've punched some holes in the pocket that will fit perfectly into your A5 6-ring planner binder.  Who doesn't need an extra pocket? 

One last note - I made 46 of these. That is not typical for me.  I tend to get bored with a thing and max out at 10 or 12 before moving to the next design in my head.  I think it was the variability of the bookmark and the pocket papers that kept me interested.  Every one is different.  They all tucked into an A7 envelope cut with my Big Shot Pro.  I got to use up a ton of holiday paper that's been laying around.  It's very waxy, so not really good for cards as things don't like to stick to a waxy coated paper.  But with an envelope seal, and an address label, it's great for cards.  Yeah!  Something else all used up.  


Sunday, April 30, 2023

Thank You

Once again, a cold Sunday in late April finds me in my craft cave. Earlier this month I posted about making mono prints.  Here, now, is the little project I was working on that made me do that.  I found myself thinking about those little Russian stacking dolls one day not too long ago.  You know the ones, where you open a doll to find another smaller one, which you open to find another smaller one etc.  This Thank You note is just like that, only it's paper!  There will be 45 of them when I get them all done.  Each will be unique in terms of its colors.  I'm thinking of sending them out as New Year's card next year, but I'm not really sure yet.  


Here is the front - with the pretty mono print up front.  Follow the little arrow's direction and flip it over...


Here is the back of it, again, follow the little arrow's direction and pull out the next tag....


Here you see the backside of the first tag, and the front of the second, another pretty mono print.  Flip the second tag over...


...to find another pocket with another tag in it, pull the third tag out....


... Tag #3 is yet another mono print, flip the third tag over for the finale...


Below is the back of all three tags.  The backs are all mass market printed paper pulled from my scrap stash. The End, with the little bunny butt is one of my favorites.  It was produced in the mid-eighties by All Night Media Co. 


Below are the fronts of all three tags.  The fronts are all mono prints I made.  They all have some kind of shine to them, as I used a lot of the Pebeo paint when making them.  The pictures never seem to do them justice, IMHO.  You can be the judge if you get one in the mail someday.  

It all started with the Russian dolls and this challenge I have going on in my head, have had it for years, about using up all this stuff I have accumulated before I die.  Now, don't get all freaked out, because I'm not dying of anything I know of other than old age, so far, knock on wood and all that, but I do think about what the heck is going to happen to all this stuff in my craft cave after I am gone.  If I use it up, and figure out how to stop accumulating more, (a big "if " there) it will be easier for those left behind when I'm gone.  With that in mind, I looked around at all the little hidey holes I have full of scraps of paper.  There are a lot of them.  Every project creates more scraps and if they are bigger than 3 inches, I save them for something else.  I decided to make a dent in them.  This little "Thank You" project is made completely of scraps I have accumulated over the years.  If you read the post about mono printing, you'll know that even that was done with scraps.  

One thing about using up scraps is it's a lot of repetition at the die cutting station.  Scraps are too small to use the Cricut cutting machine to cut 45 of this shape or that shape.  To do that easily with the Cricut, you have to use full sheets of paper, which was not my goal.  I had literally hundreds of 3" x 12" scraps of black paper.  This project used them all up!  But that meant rolling a lot of paper through my Sizzix Big Shot Express, over and over until I had enough of each shape to make 45 of these little thank you notes.  It was fun, actually.  It fed my OCD for quite a while.  And, the Express means the steel rollers operate at the push of a button, I don't have to crank a handle like I did with my original Big Shot, which I wore out a few years back.  All in all, I accomplished my goals.  The scrap piles are GREATLY reduced, for now anyway, I have a fun thank you card to send out, and my OCD is at ease, again, for now anyway.

A thing that just occurred to me as I was previewing this post before publishing...what if I never use up all this stuff?  What if all this stuff is the key to living forever?  If I never use it up, I never die.  Hmmm...spending eternity crafting things out of paper.  I'm good with that.  :o) 

Monday, April 17, 2023

Mono Printing on Monday and, What's New?


I have a lot of white scrap card stock from other projects so the strips you see are just that.  I pulled prints onto the strips of scrap to use them up.  Later they will be die cut into the shapes I need for another little project I started earlier this year.  

These are some full page prints, just to give you an idea of what you get when you print a full page. 

I spent the day in the craft cave today.  It's cold, windy and snowing on April 17, 2023 in Wisconsin.  Made worse by the previous week of weather in the 80's, if you can believe that.  

So, what's new in the craft cave....ah, yes, I bought myself a new laptop a couple weeks ago and have been getting reacquainted with all the fun things I can do again, now that my equipment is not 11 years old.  Woot!

  1. First, I set up my Cricut and cut a bunch of stuff I've been wanting to cut for the longest time.  My old laptop crapped out with the latest upgrade (well, let's be honest, the upgrade from about 3 years ago) to Design Space so cutting was limited to what I owned on cartridges (which is PLENTY, and why I didn't really miss cutting from their online collection).  
  2. Next I spent some time streaming videos from some of my favorite artists.  Patty Tolley Parrish in particular, since this post is supposed to be about mono printing.  She has TONS of videos and she live streams all the time.  A wonderful mixed media artist who loves to play and let us watch. 
  3. Next I reset the theme for my inbox and FINALLY cleaned all the crap out if it.  I've been pretty good at keeping it clean, too.  Hopefully I did not just jinx myself here.  Anyway....I digress.
A long time ago I discovered Gelli Arts and their Gelli printing plates.  Different sized plates that are best described as 1/2 thick slabs of clear Jello.  I don't know how to describe it other than that.  I have 4 or 5 different sizes of them.  The process is simple, and quick.  Dab on and brayer out colors of acrylic paint or ink (although ink is expensive) that make you happy, then before it dries you can draw in it, use a stencil, your fingers, sponges, blocks, bottle caps, anything you want to put in the paint to make it interesting, do it.  But, do it before it dries.  Lay your paper on top of the design, press down gently but firmly and let it set for a while.  Then pull up your print.  Boom!  

It's called mono printing because you can only get one print. Every other one will be different from the last.  The only time I actually pulled prints was to cover the cookie book from 2015, Flour and Butter and Sugar, Oh my! was the theme that year.  If you have one of those, pull it out and check out the cover paper.  I printed it all myself and no two are alike.  You can see a post about it using the blog contents roll on the right as well.  

Gelli printing is addictive.  Once you get going, its hard to stop.  Back in 2015 I printed so many sheets that I am just today using up the last of them. (Yes, that's 8 years ago, folks) I'm in the middle of a little "Thank You" project that used up all the mono prints I had in my stash.  I'm not done with the thing yet so I needed to print some more.  
Here are some tips, if you decide to lean into this 'habit':
  • First - wear old clothes.  An apron is not good enough.  I wear a cook's coat and an apron.  I wear my cook's coat all the time in the craft cave.  Its the perfect thing to keep me clean.  
  • Give yourself a lot of space. Once the prints start rolling off, they get tossed aside to dry pretty quickly because the paint on the Gelli plate is always trying to dry.  
  • Keep several sheets of paper next to your Gelli plate so you can roll off the excess paint from your brayer.  Sometimes what you create from cleaning your brayer is pretty interesting.  So if you like what you see, toss it in with the prints that are drying and keep going.  
  • Get yourself some shiny paints!  Pebeo makes some wonderful colors with mica in it so they really shine.
  • Black and white get used a LOT.  
  • Never clean your Gelli plate after you pull a print.  Just lay down the next colors and keep going.  The little bits of paint from the previous prints really make the next ones even more interesting.  
  • Stencils are a great way to add shapes and pops of black or sparkle to a print that may have started out too dark.  
  • Print over prints you already pulled.  Layering prints and colors makes them do wonderful things.  
  • Printing with those shiny inks on black paper is going to make you happy.  Get yourself some black bond paper.  Astrobrights makes the perfect one.  
  • Print using cheap paper.  Deli Paper is great.  Yes, those things they wrap your sandwiches in.  Perfect stuff to print on.  Glassine paper is nice too and pulling a print with Glassine will usually clean every bit of paint off your Gelli plate.  
  • Don't worry if the paint dries.  Sometimes you want it to.  If it dries on your plate, brayer on another layer of paint.  Pick something that will make a nice background.  Solid black or white is always a good choice.  Put down your piece of paper and let it dry on the plate.  When you pull it, it will take everything off the plate.  
  • Lastly, but most important - Have fun!  And, my advice is to NOT do this one with the kids.  Wait till they are 11 or 12.  Acrylic paint is permanent when it dries on your clothes.  

Tuesday, February 7, 2023

Valetines - 2023

Here they are for this year, folks.  Valentines only this year, nothing for Lunar New Year (Rabbit) and nothing for St Patty's Day, although I may still get some of those made.  If I do, I'll save them for next year.  It just depends on what ideas are keeping me up at night.  The only way to get any sleep is to make them.  Right now, I'm already toying with 2023's cookie book.  It may not be 2023, that all depends on participation from the bakers, but I've got an idea.  It's going to break all the cookie exchange rules if I get it put together.  Enough said. 

Without further ado - I like You a Waffle Lot is my favorite this year.  I added the February calendar element to this card, even though it's not in this picture.  You can see it in the other one with 14 on the front.  I was hoping the woven heart in the background was reminiscent of a waffle, but it's not so much.  That's ok.  I still like this one the best!  I kept singing the words over and over while I made them.  "I like you a waffle lot!", I like you a waffle lot, like a little jingle.  Made me happy.  Good thing I was home alone.  The cats are cool about me talking to myself.  

If you are interested in how I made the woven heart, its 1/4" strips woven together (I pin them to a cork board and weave just like normal), then glue the ends so it won't unravel.  I pick the side I like the best and cover the other side with Sookwang.  I think it's also called Scortape?  I have it in giant rolls that are 6 inches wide.  It's basically two-sided tape but really wide.  Once the sookwang is attached, I just die cut the heart with a Sizzix original (note the word ORIGINAL as wafer dies will not cut through a weave.  You need those heavy duty steel rule dies to get through a weave cleanly.)  Then. peel off the backing of the sookwang and stick it to the card.  Its super easy and keeps all those little pieces on the ends in place.  

There's a shaker card in the mix this time around and one for the bees too - It just says 'Mine' and I'm hoping the recipients figure out that the little bee on the heart is meant to be said out loud.  


Sunday, December 18, 2022

Drum Roll, please - 2022's Cookie Book!

Hey Everyone!  After a respite of 2 whole years, I got back into the swing of things in the craft cave and produced a cookie book for the sort-of-annual Cookie Exchange.  If you don't remember or are starting at the top of the blog as a new reader, this thing started way back in 2006 as a way for me to make more stuff in my craft cave.  I was never a scrap booker, but always a card maker. I wanted to do more with books, and thus the idea of a recipe book for a Christmas cookie exchange was born.  You can scroll down the list of posts all the way to the bottom and find all the books I've created over the years.  Each one is unique and crafted all by hand by yours truly.  Some years were skipped, like the year I moved to Brookfield.  And of course, we lost a couple to Covid. One year I couldn't get enough bakers to join the fun so I cancelled it.  Its all good.  

If you sign on as a baker, you send me your recipe, I approve it so we have no duplication, and it has to be from scratch as well.  No piping Santa hats on Nutter Butters at this cookie exchange, no sir.  We top out at 15 bakers, so you have to make 15 dozen of your cookies and package them for giving away.  You go home with 14 dozen different home baked cookies and a pretty cool Christmas Keepsake book, if I do say so myself.  

Without further ado, here is the book for 2022.  I make 25 of these things.  It takes me all year.  Not one of them is exactly like any other.  So, like I said, it keeps me in my craft room, happy and making stuff.  Fifteen for the bakers, my sisters each get one, and then some longtime friends who are far away get theirs too.  

Here they are ready for final cover decoration.  You can see all the colors of the felt I used.  Some are whole pieces of felt and others are scraps sewn together.  There are three ring binders holding the pages to the felt. The gold brads at the back of the book are screwed into the ring binders.  


Here is the cover, all wrapped and ready to give.  I started putting a bell on the books each year because I just like the sound of those things while I'm crafting the books.  A little jingle as they get their final touches is never a bad thing. 


Unwrap the leather tie and open the book to reveal the cover page.  We're Back and Baking! was this year's theme.  


Each page was cut and folded into a pocket.  There is a bit of dimension to them.  The paper is all two-sided card stock, so I folded down a lip on each page to show both sides.  I had a GIANT pack of dimensional gift tags I picked up from Costco maybe 8-10 years ago that got used for decorating the right-hand pages. Even after 25 books I still have not used up that whole pack. Gads.  


You can kind of see the dimension on the left-hand page here.  


Each page is numbered behind the recipe to correspond to the table of contents at the beginning of the book. I tried to make the page numbers look like a frosted cookie.  Not sure if I pulled that off, really.  But it worked either way. 


So that's it!  Now we are just sitting around waiting for the fat man to fly over and then on to the new year.  My shoe box of happiness (the place where I keep my finished cards) is absolutely empty.  I have nothing prepped and ready for any holiday next year.  I guess I better get busy.  

Happy Christmas, one and all!

Catching Up at Christmas - 2022

Its Christmas time once again, readers.  The end of 2022 is upon us.  A recovery year.  I spent a lot of time going through my craft cave and reorganizing. There was too much duplication. For example, if I was looking for stuff to make a Christmas card, I had stuff in drawers, stuff hanging over head, stuff on shelves, etc.  I took all the stuff that was hanging and on shelves, reorganized the drawers into themes, and got it all into its proper drawer.  Now I have one drawer with all the wreath making things in it, one with all Santa, one for Christmas Critters, one for candy, snowflakes, trees, ornaments, words get two drawers, and then the dreaded miscellaneous for anything that doesn't quite fit into one of the other themes. I like it so much I kept on going.  Flowers, circles, ovals, squares, land animals, birds, sea creatures, words again, birthday, valentines, 4th of july, St Pats, Thanksgiving, bees and hexagons, bugs, baby, chick stuff, ribbons and lines, etc they all have a drawer or two dedicated to everything that works for that holiday or theme. Halloween is themed out into words, pumpkins, houses, witches, cats, skeletons, mixed monsters etc.   

To be sure, some things work for more than one holiday.  When that's the case, I made a little folder to keep in the drawer that says "see also..." to point me to the drawers where something else in the theme of what I'm building might be found.  I know, I'm a little obsessive.  But finding something when you want it is key to happiness in the craft cave.  I had not done this since moving to this house in Brookfield, so it's been 8 years, maybe?  Definitely time for a cleanse and shuffle.  Rene, a fellow crafter, who has a posse of gal pals she crafts with was the beneficiary of the purge.  Perfect.  

Ok - so now that we are all organized, I found a bunch of stuff I've been hanging onto for YEARS waiting to make good use of it.  I save all my scraps.  Years of saving scraps gives you a heap of scraps.  When I'm bored in front of the TV or just in general, I pull out my scraps and start making them into tags.  I must have had 45+ Christmas tags started in a box that I finally decided it was time to use.  I added a brad to the top, stamped and embossed something Christmassy on the front and tucked it into the front of a whole pile of cards. I had a lot of printed Kraft paper, which if you don't know, is kind of like brown butcher paper, but heavier, like cardstock.  It's the perfect brown for gingerbread so these cards are all about cookies and gingerbread people, with a little tag tucked in for use as a bookmark when you find that recipe you need to mark.  

Some of the photos are a little blurry.  Sorry, my bad, they are all in the mail so I can't retake them.  Woops.  I was still short some cards for the full Christmas delivery so down there at the bottom are a couple more I whipped up after the sort-of-annual cookie exchange was over.  I had the backgrounds laying around since 2019, so used those up too.  Sweet.  That sweater weather card makes me happy.  Not sure why.  Maybe it's the Christmas tree wearing a sweater that does it.  


Sunday, January 30, 2022

Chinese New Year 2022 - TYOT Tiger

Hi everybody!  Here is the last of the next group of cards to go out with the mail next week.  I call it a mail blast.  There are a lot of holidays this time of year, so I just blast out a bunch of cards for the various celebrations.  It's luck of the draw for the recipients.  If you want to be on the mailing list, message me your address. You can find me on Facebook, or use the email posted on this blog.  I can't say you'll get a card for EVERY holiday, but you'll certainly get at least a couple throughout the year. 

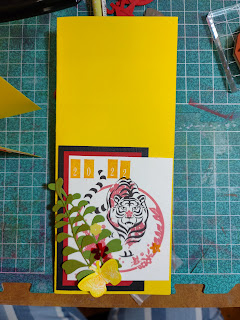
Chinese New Year starts February 1st this year and it's the Year of the Tiger.  I pulled a Getty image down from the interweb for this (I love the flower on his nose) and added some goo-gahs just for fun. I debated about whacking off the yellow space at the top, but in the end, left it there.  Some of the prints from the interweb were a little wonky, so I included those as bookmarks.  I've got my own tiny tigers running around the place so I'm all set.  

Ground hog day is getting ignored this year.  I still have zero fun groundhog stamps.  He is elusive, that's for sure.  Plus, Ground Hog Day is complicated.  Does he see a shadow or not?  Is it 6 more weeks of winter or 6 weeks till Spring?  That's a lot of detail to try to get on card.  Don't get me wrong, I love Ground Hog Day.  I spend the whole day humming Sonny and Cher's "I Got You Babe" in remembrance of the radio alarm clock from the movie.  I have made cards for this holiday in the past, but they were odd to say the least.  I think Andrea Sitzman probably got them.  OK! This is me ending the overthink about Ground Hog Day.

We have Valentine's Day in mid-February of course, and the Covid Anniversary card takes us to the beginning of March.  I've already got my St. Paddy's Day cards all done from last year, so that means I get to devote my attention to the cookie book until it's time to brake and make July 4th cards.  

I'm looking forward to putting the book together. I have not said that in over two years.  Hmmm.  I have a pretty good idea of the structure I want, but I'm going to have to custom cut all the page pockets.  I've got 4mm felt for the book cover, which is thick enough to perhaps be troublesome to cut, so I'll have to figure that out too.  All in good time...

Happy mid-Winter!

Thursday, January 13, 2022

Valentines - 2022

I mentioned in my post about Glue a few days ago, finding some finished valentines that were kind of mucked up because I used the wrong glue.  I was able to add a few details to them and salvage them.  Here are the two finished and then finished again, Valentines.  I added the red frame over top of the window heart.   The one below has its glue mess on the inside of the card.  I glued all those sequins on one by one and the paper couldn't take it.  It was a simple thing to cover that over on the inside.  These two have quite a bit of dimension to them.  They are going to take extra postage.  


New for 2022 are Valentine, You're Out of this World, and Valentine, You're just my Type.  That little dog baying at the moon makes me happy.  And the juxtaposition of the modern text slang of UR included with the clearly old school concept of a typewriter, well, that makes me happy too!  Ha!


The (hopefully not annual) Pandemic Card

Welp, here we are, close to ending the second year of the pandemic.  Not close to ending the pandemic, mind you, but the end of the second year.  I mark the years by the anniversary of the original lock down here in the US.  You may mark your pandemic anniversary as you see fit.  For me, it's March.

The first card I made to acknowledge the pandemic was a late addition to the Halloween cards in October 2020.  It depicts the year 2020 rising up as a foul steam/stench from a little witch's cauldron where she clearly didn't know what she was concocting when she brewed that spell. 

We can now mark 2020 and 2021 as forever changed, different, awkward.  I am resisting what is apparent to many, that the old ways of life are gone, and we are now living in a Post Covid world.  Maybe we are never going back to the old ways of life, where hugging and handshakes were normal, where a kiss on the cheek and a walk arm in arm after dinner was normal.  It makes me sad if it's true.  Someday, I will process and accept the post Covid reality, whatever that winds up being.  But for now, I will continue to quietly resist, and keep just a little bit of hope alive through the good humor of my Pandemic Cards.  

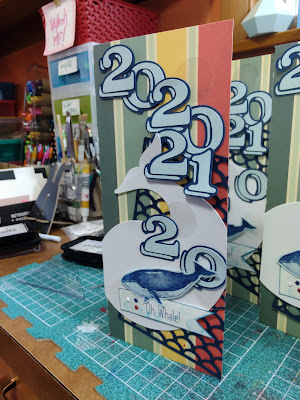
To that end, here is the 2022 Pandemic Card:  Oh Whale!  

There are 6 of these, so I took some shots of the whole school of fish. :)

The years of the pandemic are bubbling up the card front from somewhere deep in the sea.  If you look closely, there are some clear bubbles mixed in with the numbers to add a little visual help to see those numbers as bubbles. The fish scale background (Edge to Edge), and numbers (Chalkboard Fonts) were cut with my Cricut. The white whale is a Sizzix quilting dye and the blue whale is a stamp from Big Red Rubber Stamps.  

The white whale, hmmm.  I suppose if you're name is Ishmail, he's probably a bad omen.  But recently I read or watched an article about a rare white dolphin swimming in the South China Sea, that when spotted by fishermen, they take it as lucky.  A hundred years and more ago the white dolphins were plentiful, competing with the fishermen for food.  Back then they were hunted just to be rid of them.  But now, there are so few left, it's lucky to see one.  Like the white dolphin, my white whale is a hopeful sign, that soon mother nature will give up trying to kill us off and see that we have learned our lesson.  Of course, we have to actually learn that lesson.  Clean air, clean water, clean food.  Take only what you need, there is no reason for greed. 


Friday, January 7, 2022

Glue to You

I got a little busy today, finishing up some Valentine's.  I went rummaging around in my box of valentine scraps and found two finished cards that did not make the cut a few years ago.  I used the wrong kind of glue which ruffled up the paper a bit.  That's the thing about glue though, you can really make a pig's ear out of a thing if you don't use the right stuff. 

If you're wondering, I've pretty much settled on three kinds of adhesives in the craft cave.  Which is not to say I don't use others, like foam squares and sticky dots, but these three are my go-to sticky things.

    1) Hot glue is a favorite.  Yes, yes, it can be stringy, but you just have to get the hang of it.  Maybe your first project with hot glue will look like a pig's ear, but your next one will be just fine.  I promise.  It can add dimension in a snap, it sticks things down FOREVER, which is important when your card sits in a shoebox for sometimes YEARS before you send it, and its beyond cheap if you buy those sticks in bulk.  

    2) After hot glue, comes the Tombow tape runner.  I dare to say, the best tape runner ever.  And, I've used them all, people.  Some of you out there get mad because these are small.  You use them up too fast for what they cost at the local Michaels.  Buy your Tombow refills in bulk at any online office supply store that sells them.  If you buy enough (go in with your gal pals to increase the amount you can buy) you can get them below $2 a piece.   

Out of curiosity, how many of you bought one of those HUMONGOUS tape runners that held like IDK 10 miles of 1/4 inch tape?  They were popular!  I would teach a card class, and there would always be someone with one of those at the table.  Banging it around and getting it stuck on all the wrong pieces.  Man, talk about making a pig's ear out of something.  

So, what am I talking about?  Well, a bunch of years ago, someone in the industry got the idea to redesign what is essentially a packing tape dispenser to work with 1/4 inch 2-sided tape.  That thing was huge and heavy as a bag of rocks.  So much so as to make the user have to stand up and lean over it to get the tape where they wanted it to go.  I gave them an A for effort.  They were trying to bring down the cost of tape refills for the average scrapbooker.  It was a good problem to try to solve, but for this little ol' gal, it was nope at first sight.

    3) When I need actual glue, PVA is the best for paper projects as it won't curl your paper, It works like a gem with fabric, and when it dries it's still flexible, so it won't crack.  It dries fast and cleans up with water and is also inexpensive.  I've had my bottle for going on 6 years or so and it's still not near empty.  And that's me, people.  I use the crap out of my stuff.  

Monday, January 3, 2022

A new little wiggle-thingy

 Hi Folks, 

Just playing around a little on a January day.  I've got a pile of projects taking up space on my table, so I thought I'd take a whack at one or two of them today.  This is the pile....


And here is the card I pulled out to play at:  

First- A look at the stuff I used just to keep things honest and above board.  That little bag over on the right from Simon Says Stamps, that's the thing that made me start to play today.  They call them Mini Springs.  They let you add a little wiggle to an element on your project.  As you can see, I'm putting a Halloween card together.  I've said this many times, there are no seasons in the craft cave.  Today, its Halloween! 


Here is the finished project.  I tried to get a shot to show the spring raising up the skelly head on the card front.  I took a little movie so you can hopefully see the BOING!! effect after you stick it all together.  Kind of fun and importantly, it squishes flat when you load it into the envelope so the post mangler may actually let your card arrive and pop out like it should.  I have not yet mailed one of these to myself as a test yet, but that's next.  Stay tuned...