Thursday, January 13, 2022

Valentines - 2022

I mentioned in my post about Glue a few days ago, finding some finished valentines that were kind of mucked up because I used the wrong glue.  I was able to add a few details to them and salvage them.  Here are the two finished and then finished again, Valentines.  I added the red frame over top of the window heart.   The one below has its glue mess on the inside of the card.  I glued all those sequins on one by one and the paper couldn't take it.  It was a simple thing to cover that over on the inside.  These two have quite a bit of dimension to them.  They are going to take extra postage.  


New for 2022 are Valentine, You're Out of this World, and Valentine, You're just my Type.  That little dog baying at the moon makes me happy.  And the juxtaposition of the modern text slang of UR included with the clearly old school concept of a typewriter, well, that makes me happy too!  Ha!


The (hopefully not annual) Pandemic Card

Welp, here we are, close to ending the second year of the pandemic.  Not close to ending the pandemic, mind you, but the end of the second year.  I mark the years by the anniversary of the original lock down here in the US.  You may mark your pandemic anniversary as you see fit.  For me, it's March.

The first card I made to acknowledge the pandemic was a late addition to the Halloween cards in October 2020.  It depicts the year 2020 rising up as a foul steam/stench from a little witch's cauldron where she clearly didn't know what she was concocting when she brewed that spell. 

We can now mark 2020 and 2021 as forever changed, different, awkward.  I am resisting what is apparent to many, that the old ways of life are gone, and we are now living in a Post Covid world.  Maybe we are never going back to the old ways of life, where hugging and handshakes were normal, where a kiss on the cheek and a walk arm in arm after dinner was normal.  It makes me sad if it's true.  Someday, I will process and accept the post Covid reality, whatever that winds up being.  But for now, I will continue to quietly resist, and keep just a little bit of hope alive through the good humor of my Pandemic Cards.  

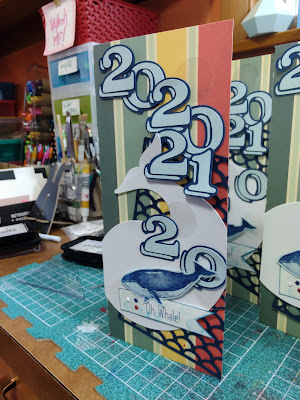
To that end, here is the 2022 Pandemic Card:  Oh Whale!  

There are 6 of these, so I took some shots of the whole school of fish. :)

The years of the pandemic are bubbling up the card front from somewhere deep in the sea.  If you look closely, there are some clear bubbles mixed in with the numbers to add a little visual help to see those numbers as bubbles. The fish scale background (Edge to Edge), and numbers (Chalkboard Fonts) were cut with my Cricut. The white whale is a Sizzix quilting dye and the blue whale is a stamp from Big Red Rubber Stamps.  

The white whale, hmmm.  I suppose if you're name is Ishmail, he's probably a bad omen.  But recently I read or watched an article about a rare white dolphin swimming in the South China Sea, that when spotted by fishermen, they take it as lucky.  A hundred years and more ago the white dolphins were plentiful, competing with the fishermen for food.  Back then they were hunted just to be rid of them.  But now, there are so few left, it's lucky to see one.  Like the white dolphin, my white whale is a hopeful sign, that soon mother nature will give up trying to kill us off and see that we have learned our lesson.  Of course, we have to actually learn that lesson.  Clean air, clean water, clean food.  Take only what you need, there is no reason for greed. 


Friday, January 7, 2022

Glue to You

I got a little busy today, finishing up some Valentine's.  I went rummaging around in my box of valentine scraps and found two finished cards that did not make the cut a few years ago.  I used the wrong kind of glue which ruffled up the paper a bit.  That's the thing about glue though, you can really make a pig's ear out of a thing if you don't use the right stuff. 

If you're wondering, I've pretty much settled on three kinds of adhesives in the craft cave.  Which is not to say I don't use others, like foam squares and sticky dots, but these three are my go-to sticky things.

    1) Hot glue is a favorite.  Yes, yes, it can be stringy, but you just have to get the hang of it.  Maybe your first project with hot glue will look like a pig's ear, but your next one will be just fine.  I promise.  It can add dimension in a snap, it sticks things down FOREVER, which is important when your card sits in a shoebox for sometimes YEARS before you send it, and its beyond cheap if you buy those sticks in bulk.  

    2) After hot glue, comes the Tombow tape runner.  I dare to say, the best tape runner ever.  And, I've used them all, people.  Some of you out there get mad because these are small.  You use them up too fast for what they cost at the local Michaels.  Buy your Tombow refills in bulk at any online office supply store that sells them.  If you buy enough (go in with your gal pals to increase the amount you can buy) you can get them below $2 a piece.   

Out of curiosity, how many of you bought one of those HUMONGOUS tape runners that held like IDK 10 miles of 1/4 inch tape?  They were popular!  I would teach a card class, and there would always be someone with one of those at the table.  Banging it around and getting it stuck on all the wrong pieces.  Man, talk about making a pig's ear out of something.  

So, what am I talking about?  Well, a bunch of years ago, someone in the industry got the idea to redesign what is essentially a packing tape dispenser to work with 1/4 inch 2-sided tape.  That thing was huge and heavy as a bag of rocks.  So much so as to make the user have to stand up and lean over it to get the tape where they wanted it to go.  I gave them an A for effort.  They were trying to bring down the cost of tape refills for the average scrapbooker.  It was a good problem to try to solve, but for this little ol' gal, it was nope at first sight.

    3) When I need actual glue, PVA is the best for paper projects as it won't curl your paper, It works like a gem with fabric, and when it dries it's still flexible, so it won't crack.  It dries fast and cleans up with water and is also inexpensive.  I've had my bottle for going on 6 years or so and it's still not near empty.  And that's me, people.  I use the crap out of my stuff.  

Monday, January 3, 2022

A new little wiggle-thingy

 Hi Folks, 

Just playing around a little on a January day.  I've got a pile of projects taking up space on my table, so I thought I'd take a whack at one or two of them today.  This is the pile....


And here is the card I pulled out to play at:  

First- A look at the stuff I used just to keep things honest and above board.  That little bag over on the right from Simon Says Stamps, that's the thing that made me start to play today.  They call them Mini Springs.  They let you add a little wiggle to an element on your project.  As you can see, I'm putting a Halloween card together.  I've said this many times, there are no seasons in the craft cave.  Today, its Halloween! 


Here is the finished project.  I tried to get a shot to show the spring raising up the skelly head on the card front.  I took a little movie so you can hopefully see the BOING!! effect after you stick it all together.  Kind of fun and importantly, it squishes flat when you load it into the envelope so the post mangler may actually let your card arrive and pop out like it should.  I have not yet mailed one of these to myself as a test yet, but that's next.  Stay tuned...


Wednesday, December 8, 2021

Christmas 2021 - A Whole New Approach

Hi Everyone!  Hey, look at me getting the 2021 Christmas blog post out well in advance of the holiday!  Wow, who am I?  Well, its still me, but I'm fully retired now.  No more part time at Costco.  All done!  Catching up on my sleep still, but man, it is super nice to know I've got all the time in the world.  

The craft cave is my happy place, even more so in the times of Covid.  It was July when I started these.  I couldn't bring myself to go through my stash and plan a pile of cards like I normally would.  Covid and Costco wore me down. And, let's be honest, the stash is LARGE.  Overwhelming, is a good word.  I was thumbing through my papers, because that relaxes me but giving the stink-eye to everything else.  

I found a few sheets from Photo Play Paper's Christmas Cheer collection.  I didn't have all the designs, just a few, but the Internet never disappoints, right?  A quick search and boom! Two collection packs as well as an ephemera pack were on the way.  


This is NOT like me AT ALL.  Limiting my color pallet, using stickers?  Who am I?  But, I have to admit, it was kind of fun.  In the end I did fish out a couple of stamps and a die cut or two from the aforementioned overwhelming stash. I used some paper twine to embellish here and there, but that was it.  Every card is the same size and uses a cream colored base.  I added in some red and green card stock for a little more color pop, and at the very end, judiciously dabbed glitter glue here and there to bring up the sparkle.  

A total of 41 cards were made from just these 2 packs plus 1 ephemera pack.  Sure, sure you can look on their website and get ideas for how they put cards together, but what fun is that?  Me, I just entered the flow and kept going.  

Some of these are odd, no doubt about it.  There were a LOT of clothing items in the sticker packs, hats, mittens, coats, boots, skates.  Too many, really.  I managed to make a wreath of hats and mittens on one card, using up all of those real fast, and used one coat and boots on another.  After the 41st card (the one with three pairs of skates) was finished, coats and boots are the majority of what is left on the craft room floor.  Still, it was fun, and I was humming "Its the most wonderful time of the year" for hours while the magic happened.  

Without further ado, here they are, 5 and 6 to an image, so you'll have to click to embiggen to get a good look.  No two are exactly alike.  


Sunday, February 14, 2021

Christmas 2020


Ok - Better late than never!  It's Valentine's Day and I'm finally posting about last Christmas' cards.  It's been kind of hard.  Between the insanity that is our national political scene and the pandemic, I guess I'm a little out of focus.  Ah welll...

This first one was inspired by what I see in the stores lately.  It seems the greeting card companies are going out of their way to make store bought cards look hand made.  They have lots of die cuts on them and a greeting, but somehow they never seem to lose that massed produced look.  This card is composed completely of die cuts.  The little gingerbread people and candy in the window box got stamped and embossed and then die cut, but that is the only stamping and inking in this entire card.  It was not much fun to put together, I must say.  The dies are for the most part very intricate, and a lot of picking went into getting that snowflake background free of it's moorings once it was cut.  Likewise all the ferns and leaves in the window box.  I'm thrilled with the results, but it just wasn't any fun.  I made 8 of them.  That's it.  I think it looks better than anything you can find in a store, and I guess that's what I set out to prove with this one, so, I win!  :)


Apparently the window box full of Christmas Cheer was a theme.  That's what this one reminded me of when I got it all together.  I was using up some scraps of things so there were only 2 or 3 of these made.


This card was probably started 6-7 years ago when Washi Tape really hit the paper crafting scene.  Some of the strips on the card are washi tape attached to white card stock and then fussy cut out to have a border, and some are stamped images of ribbon, fussy cut out with the same kind of border.  I had a habit of not wanting to throw out scraps, so when I had a pile of white, I stamped it or taped it and made these strips, thinking one day I'll use them in a card.  And here it is!  I amassed a pile of the little strips and laid them down to make the background.  An easy way to turn cardstock that's not Christmas themed into something that is. 


The Bee themed card has become a staple in my repertoire.  Although, I did not actually keep bees this past year.  Its a) expensive to keep buying bees and b) heartbreaking when they don't survive the winter so I took a break.  I left the hives up in the hope of enticing a wild swarm, but got nothing.  I'm not really thinking I'll be a bee keeper again any time soon, but you never know.  I will keep up with the Bee themed cards because its fun and unusual, and I've amassed a LOT of bee things in the craft cave.  So, with that said, here is BEE MERRY for 2020.

Another theme I do just about every Christmas is a the Sugar Plum Fairy.  I don't know why I love her so, but she gets me and I like making them so here is the 2020 version of the card.  I think only Andrea Sitzman has a full collection of them all, if she keeps them that is.  For some reason, I send her family one every year I make them.  Now, I don't expect people who get my cards to cherish them for posterity.  If you toss them when the season is over, I am not offended.  I made them for selfish reasons and send them to you all to make room for more.  I have this blog to archive all the designs over the years.  So it's all good.  


Last but not least is the Santa card.  I like Santa.  Who doesn't?  I think one year I combined the Santa card with the Bee card and it said Bee Jolly.  There are no rules.  Again, using up some scraps cutting those zig-zags by hand, made for a fun background.  I believe on some of the cards I had Santa Claus, but the Claus kept falling off.  Santa was stamped and embossed to a shiny red finish before being fussy cut.  It's not always easy to get something to stick to that shiny surface. 


 As I noted earlier, it's Valentine's Day.  There are a couple of Christmas cards in the shoebox of happiness for 2021, but not enough by any stretch of the imagination.  I don't feel like making them.  I have some ideas laid out, but they are not speaking to me just yet.  I did make 10 Valentines, but will save them for 2022.  When the pandemic hit last year, it was closer to St Patrick's Day, so I made a pile of those.  I'll send those out in March, and save the Valentine's for next year when I will probably skip St Paddy's.  

One thing I am still making are Halloween Cards.  I did the Halloween post on time last year and haven't stopped churning them out.  So it's highly likely that Halloween 2021 will be the big card submission for this year.  I may skip Christmas cards entirely in 2021, we'll see.  July may come around and I'll get out the tinsel and glitter and see what happens.  Who am I kidding?  There will be no glitter.  Especially not in the heat of summer.  Ick.  

Best and Kind regards to you all - 

A.

Thursday, October 15, 2020

Halloween in the "Time of COVID"

 As the back side of 2020 approaches, Wisconsin is backsliding into "COVID Central" for the whole United States.  I gotta say, it's wearing me down. I can't really put my finger on why, but it feels like attention span fatigue. (Yeah, I just made that up.) No focus, even for the fun stuff.  

So what does a girl do to perk up her spirits for Halloween?  Into the craft cave we go!  It is, after all, her favorite time of year.

As I rummaged around looking for papers and stamps to play with, it became very apparent that I've been hoarding some stuff for a LOT of years.  I decided this was the time to get out the old, and make something new from it.  I found some 8.5 x 11 cardstock that I'm sure I bought at the old Scrapbook store in Cedarburg more than 10 years ago.  Some was printed, some was not, some was green some was purple. I pared it with a fabulous stamp drawn by Daniel Torrente and sold by Stampotique.com, a couple of sentiment stamps, one from Brutus Monroe (Hello Pumpkin), the other from Poppy Stamps (Give 'em Pumpkin to talk about).  Some scraps of black to make the pocket, some punches, ink and hot glue and Boom!  There you go.  Simple starts lead to greater things....


Next up, Alice in Wonderland.  Man, I have been hanging onto the full set of Alice in Wonderland stamps for longer than I can remember.  And have I ever used them?  No. Ugh.  Not even the Mad Hatter, for fuck's sake!  Well, I'm still going to save HIM for something special.  I don't know what, but it'll be something.  This year, its the Red Queen on Halloween.  Off with her head!  Googly eyes and a skelly trinket, fun stuff, that.  


I have a small collection of Ninja stamps, because, why not?  Judikins Boy Ninja made it to the card, but I stamped 'him' in pink, because he is a she.  Period.  Full stop.  I also have one from Inkadinkadoo, Crafty like a Ninja, because, well, of course I am.  What'sabi??


With a minimalist approach to this one, I grabbed usable scraps from my rather large bin.  I throw very little out.  I mean, it's got to be pretty small for me to toss it, and even the tiny scraps get saved and used to mark the path for trick or treat.  Its all acid free paper, so harmless to the environment.  I toss the tiny stuff like confetti.  It's fun, and the kids like to look for the different shapes of this or that, that wind up in the toss.  I don't suppose there will be many trick or treaters this year, given Rona, but I'm still putting out candy.  Maybe only the raccoons will get it, but it's Halloween, damn it.  


Last but not least, All Dressed up and No Where to Go.  Stupid Covid.  Ugh.  I love sequin waste.  You can find it on Etsy in lots of colors.  Amazon has some, but you have to by huge amounts of one color.  It's also called Punchinella, or Punchinello.  Don't ask me why.  It is, in fact. the waste product of producing sequins.  Now, sequins, are bad for the environment.  Micro plastics, don't you know.  Glitter too, (Andrea!)  While I've never been a fan of glitter, I do own an embarrassing amount of sequins.  So, if you ever get a card from me with sequins on it, don't throw it out!  


Happy Halloween to you all.  I've got a couple of pumpkins out, and if I get myself off the couch I'll doll up the front porch like I usually do this time of year.  No promises. I'm just taking it day by day.  Hell, I may not even send the cards.  Its enough that I made them, sending them may take another year.  They can hang out in the shoebox of happiness.  Lord knows the Christmas Cards I've got in there have been there quite a while.  It's a happy place, that shoebox.  I named it well.  

EDIT - a late addition to the cards this year - Its all my fault!  I pulled together three different stamps from three different companies to bring this one together.  Some fussy-cutting to make it interesting and there you have it.  


Tuesday, February 11, 2020

2020 Lunar New Year- TYOT Rat.

My first ever Lunar New Year Card!  Don't know why it took me so long to want to make one of these, but it did.  I think I've been holding out for a really cool set of Chinese New Year character stamps.  Still yet to be found, BTW.  If you know of one, link me in.  Sure I can find the odd dragon, or rooster, but it would be cool to have a full set.  Like I said, link me in if you find something.  Bigger is of course always better.

Yes, there are images I can buy from various web sites that sell such things, but digital card making sucks.  There I said it.  I like my ACTUAL stamps.   I like wood mounted better than cling, and red rubber better than anything else out there.  I'm a purist.  What can I say.

Since nary a Christmas card did I send this past season, I went all out for the Lunar New Year and combined it with some Valentines I had in the shoebox of happiness.  It looks like those Valentines were already blogged about back in...wow, 2015?  I've been hanging onto them for 5 years?  I don't hang on to sweaters that long.

Since you can see those using the blog archive on the right, I'll not post those photos.   But here are some shots of The Year of the Rat.


Tuesday, February 4, 2020

2019 Cookie Book - It's A Wonderful Life

Since its well past Groundhog's Day 2020, I figure its time to get the 2019 Christmas Cookie book up on the blog.  Yeah, I know, better late than never.  The 2019 cookie exchange went off without a hitch. Thanks to all the cookie bakers extraordinaire for all the love and willingness to share.  You guys are the best!  

If you recall, I had to cancel the 2018 exchange as I could not get enough bakers to fill out the roster.  I design the cookie books for 15 recipes.  Producing one for a shorter list of recipes means that a lot of time and effort goes to waste.  These things get started in March or April in order to be done by the holiday.  So, 2018 got cancelled and that year's book was put on the shelf for 2019.  

I remember Lauryle Schaffer caught up with me one day at Coscto in the summer of 2018, which is where and when I finally settled on the 'It's a Wonderful Life' theme.  I was toying with it, but once I said it outload to Lauryl and her husband, that somehow made it stick.  Now I just had to figure out how to get Zuzu's petals on the thing.  As I said, 2018 got cancelled so I caught a break.  I now had another whole year to figure that out.  

If you've ever read any of my older blog posts here (September 2012, I think), you'd come across one that talks about the Ring Lord.  An online shop I stumbled across that sells chain maille rings.  Yes, there are people who make chain maille, although it is most often used as the building blocks for jewelry.  There is another post on here about a Halloween bracelet I made using rings from the Ring Lord, or maybe its all the same post.  It was a while ago, feel free to browse the afore mentioned posts using the Blog Archive list on the right hand side of the page.  I'm too lazy to link them in.  

Anyway, the summer of 2019 found me incapacitated with a truly amazing amount of pain whose root cause was in my back.  I had 4 solid months to literally sit on my butt and recuperate as best I could.  Around mid August, things started to calm down, but I was still left with doctor's orders of no lifting, bending or twisting.  I made Gene rummage around in the craft cave to fish out my giant, heavy box of chain maille supplies, which he did, kindly, even though it gives him a rash to set foot across the threshold.  Poor guy.  He was a trooper last summer, that's for sure.  Armed with my box of stuff, a couple of books, access to the internet and some pliers dipped in rubber, I finally figured out the chain maille flower.  I made it in a couple different sizes, but decided to go big.  Thus, Zuzu's petals were finally on the book.  Woot!  I settled on a little jingle bell too, so that every time a bell rings, an angel gets it's wings.  

I struggled with the number of bells to put on these things.  I really did.  I  bought enough damn jingle bells to have one on every strand of the fringe on the back of the book. (32 bells that would have been, don't bother to count the ribbons) They gave me a headache to have them jingling constantly, so many of them at one time.  It was way, way over the top, design-wise.  Less is more.  My demo book went through a number of iterations (which is normal) one of them being the removal of all but one jingle bell.  What I'll do with the massive pile of left over jingle bells has yet to be determined.  

I struggled with the cover itself, too.  I had picked a set of fabric quilting squares, all with coordinating colors and patterns that I loved.  The fabric was glued to the book boards and backs to form the basic structure of the book.  The ribbon binding came next with the pony beads for detail. Which covered all the fabric on the book back.  Then I built this big title; It's A Wonderful Life, with the BIG chain maille flower, which by the time I got it all together was covering the entire front of the book.  You could only see the fabric if you looked at the back of the book.  Boo.  

Plus, I have to admit I was tired.  It had been kind of bummer year for me, the whole of 2018.  The current political situation, the medical issues, getting used to a new normal after them, I don't know, I just struggled with the whole idea of Christmas in 2019.  The book was bugging me.  There were just too many elements to it.  I needed simple but I had created a monster.  The fabic, the fringe, the pony beaded binding, the title, the bells it was all too much.  But I had to get it done.  Bakers were buying bags of flour and pounds of butter by this time.

I went as far as to glue one of the title pages onto the front of one of the books.  But, dammit, I just was not happy with that.  So, one of you does indeed have a book with the title page on the front.  The rest of you don't.  One or two of you have a book without pony beads on the binding, the rest of you have them.  Like I said, it was a struggle.

I woke up one morning about a week before the exchange and had a revelation.  The endpapers on the inside covers of the books were plain.  Just colored card stock coordinated with the fabric covers.  If I put the title page inside, on the endpaper, that solved the problem of hiding the cloth on the front, and solved the problem of the book being JUST TOO MUCH.  You can't see the title until you open it, and once you do, you can't see all the other jazz.  Yeah!  One final edit that happened this year was to omit the index.  Above I told you there are 32 ribbons that make the fringe, two for each page, 15 pages and an index equal 16 pages times 2 ends of the ribbon for each page = 32.  If you look really close at the end of the book you'll find one spare ribbon without a page.  That was where the index was to go.   

Alright, enough history....without further ado, I give you; It's A Woderful Life.  Click on any image to embiggen.  

Love to all, and to all a good night.

Book front, with one little bell. :)

Close up of the ribbon binding.  See the pony beads?

The fringe on the back.

The pages fanned out.

And the book title page with the chain maille  flower.


Monday, February 26, 2018

IO - Stamp & Die Block Duo - A Review

Hello All - I had some time to play these past couple of weeks, where one of the things on my to do list was finish up next year's Christmas cards.  I have in mind to make one that showcases a lot of holiday cookies and candy. I'm not quite sure what the finished card will look like, but the basic theme made me want to play with these Stamp & Die Block Duo's from Impression Obsession.  Click on any photo to embiggen.

They've been around for a while, so should not be hard to find if you are so inclined.  I have two sets pictured below. Cookies and Candy.  I included the Re-inker bottle to give you an idea of the size when completed.  They are essentially the size of a paper charm you might buy from Jolee's Boutique, but here you have the added benefit of having made it yourself. Making your own embellishments always amps up the wow factor on your finished cards.  No question about it.  


Stamp the images on the paper of choice, here I am using brown ink on white cardstock so the finished cookies look like iced gingerbread.  I also stamped and embossed with white powder on craft cardstock to get a frosted cookie look. Play, play, play...


Line up the die so the edges cover the square outline and tape the die to the cardstock with some scotch tape.  If you skip the tape, you risk the die moving ever so slightly, and then your cookies will look a bit wonky.  My advice; use the tape.


Run it through your die cut machine and use a pick to pop out the cookies.  The bell, snowflake, and candy cane seem to be just a hair off.  I find that if you try to correct the placement of the die to fix that, then you have three others that are just a bit off.  So all in all, the cookie set works fine, but if you are a perfectionist, you could drive yourself nuts trying to get it j-u-u-u-u-st right.  Me?  I'm happy with the results. 

Next up is the candy set....It works exactly the same way as the cookies, but straight away you'll notice that the stamped candies are larger than the die cuts so even if you are off a bit with the placement, the dies will compensate for that giving you perfect little starlight mints and candy canes every time.  Again, the cat's eye ink pad is included to show you the finished size of the candy.  There are two sets in the final picture.


So - on a scale from one to ten, I give these guys a solid 8.  I knocked off one point for the size.  I'd like them to be a little bigger.  I knocked off another point for the slight imperfect cuts on the cookies.  Since it's only that set that had the problem, I should really give them an 8.5 out of 10.  Ok, I talked myself into it!  Done!