Thursday, December 13, 2012

The Rose Breasted Grosbeak

This card, still with a song as it's backdrop includes Tim Holtz's bird image.  This is a Stamper's Anonymous wood mounted version, so you'll have to find it there.  It is, of course, a Rose Breasted Grosbeak in silhouette.  I layerd over some holly and ivy cut from Cricut's December 25th cartridge.  We are still using WRMK's Merry January card stock and that Merry Chistmas stamp is from my latest favorite Etsy store, Picture Show.  The inside of this card finishes the chorus with "...and a happy new year!" 

I thought about chalking the breast of the bird to reflect it's natural red color, but I stamped this on a pearl textured paper and I did not like how the color took to the paper after a trial run.  So, he stays in silhouette. 

Christmastime is here...

Hidey-Ho, Everyone!  It's Christmastime once again, and we have got no snow.  :/  Despite that, I'm beginning to get in the groove.  Here are some cards to help you do the same. Once again I take my inspiration from the music of the season.  Vince Giraldi's 'A Charlie Brown Christmas' is often on the iPod this season so, to pay homage, I put some papers from a couple different lines together to make these two versions with the same theme. 

We have WRMK's Merry January line mixed with Bo Bunny's Timepiece line, and to add some shine I pulled a sheet from Die Cuts with a View's Glitzy Glitter Neutrals Stack.  (Sorry, I could not find this product on their site, which btw, is a terrible site.  They could use some help there, but I digress...  They have a brights version available on Amazon but not the neutrals).  This stack is REALLY nice.  It's not your typical DCWV nasty, stiff, white core, impossible-to-crease-cleanly paper.  Rather it's paper coated with a nice, heavy vinyl.  The glitter stays on the paper, not all over your room.  Yeah!  They got something right!  (Am I being harsh?  :p )

Anywhoo...I've added in some clock hands, an oldie but a goodie from Sizzix, a snowflake from Lifestyle crafts, and another from Memory Box.  The words? Just use your computer, folks.  That's what its good at. 


Wednesday, October 17, 2012

A follow-up...

....To the Ring Lord post...http://annespaperplace.blogspot.com/2012/09/the-ringlord.html

Ha!  I'll have you know there are now a total of 4 Halloween bracelets in existence now.  My original,  one I made as a gift for my friend Ann Flick, and I actually SOLD 2 of them for $30 each.  How about that?

And, I'll digress with you into my next nutty adventure that I could not pass up.  (Damn Pinterest all to hell...)  I'll confess I've been a bit of a secret fan of Hello Kitty for a while now.  I know, I know, but before you judge me, follow the link below to ORCA Tactical.com and you'll see just how cool Kitty is.  I bought 5-6 of these little patches.  I'm not quite sure what I'll do with them yet, but she was just too bad-ass to pass up.  I'm holding out for the Hello Kitty Iron Man patch which is out of stock right now.  I guess that means I'm not the only one who thinks Kitty is bad-ass.

http://www.orcatactical.com/store/search.aspx?searchterms=Hello+Kitty


Tuesday, October 16, 2012

Halloween 2012 - Part 2

They are Trick-Or-Treating the Saturday before the holiday this year so I needed to snap-to on getting the treats packed up for the kids.   True to a paper crafter's nature, I throw nothing away.  I have this bin full of Halloween themed scraps and trinkets from over the years.  Yes, there's one for Christmas and Valentine's too...  from this I can whip up tags for the treat boxes. 

 
This pile of stuff transforms to backgrounds first.  I save the negative images from my die cuts too.  They always add interest to otherwise plain backgrounds.
 
 
Then come the stickers, trinkets, ribbons and what-have-you.  Before you know it, there are a pile of finished tags and a smaller pile of trinkets and trash.  The mom's like these too.  They add them to their own scrap book pages.  They make good bookmarks, although, since each has a pin on it suitable for pinning to your backpack, you'd have to take that off before using it as a bookmark. 


Happy Halloween!  - AMK

Sunday, October 14, 2012

Halloween 2012 - Part 1

It's a rainy day here and I'm lovin' it.  It's a rare Sunday I get all to myself.  And, left to my own devices, into the craft cave I go!

Fresh from the latest stamp show in Milwaukee, this wonderful lady packed up her Etsy store and brought it to the show.  No matter what I do, for some reason I can't get this picture to rotate correctly but here's a shot of some of her Halloween collection and a link to her store.  The cat's ass is too funny, and may wind up on the back of a whole lot of cards in the next little while.  Her prices are reasonable and if you order from her Etsy store, she sends you a little freebie.  At least she did for me.

http://www.etsy.com/shop/pictureshow?ref=seller_info


Next up is what I'd call a CAS (clean and simple) Halloween card.  I know, hard to believe from me, right?  I used a die cut from Die-Versions that fills a 5x7 card nicely.  Hang it on a full moon cut from velum and add your favorite witches hat stamped in orange and clear embossed for some shine.  The bling possibly takes it out of the CAS category, but come on...what could you possibly have against some bling?


The entry is all set up for Halloween, got that done before the rain this weekend.  Fingers crossed the lighting does not short out before Trick-or-Treat.  There's Pye right on queue.  She'll sit there all through tick or treat waiting for kids to come to the door.  And, of course my reflection...no photo shop skills to remove it.  The spider's name is Steve.  Kids have asked, and I was not prepared so named him on the spot.  Now when they come they pat him on the head and say "Hi Steve!"


Happy Sunday, everyone. - AMK

Wednesday, September 12, 2012

The Ringlord...

In my last post I alluded to some things I'd been doing over the summer that I have not yet shared.  Before I share this little project there's a back story that goes with it...

Two years ago, while making the Death By Chocolate cookie book, I found myself in need of a LOT of jump rings.  I needed to build paper Death ornaments and was using jump rings to connect the bones of his skeleton together.  (I know, what the hell (pun intended) was I thinking, right?) 

In my search, I found myself on The Ringlord's website.  Yes, that's what he calls himself.  You too can go there, www.theringlord.com , will take you right to his online shop.  His craft is making chain maille.  Yes, you read that right.  All you 'King Richard's Fair' knights of the round table wanna-Be's, take note.  He sells everything you need to make ANYTHING you want out of tiny metal jump rings, any color, any metal, any size.  It's jump ring Nirvana.  I swear.

I have, to this day, no idea what came over me.  I bought what I needed, to be sure, and then oh-so- very-much more.  It's a sickness.  I fully admit it.  I definitely need a support group.  When the box arrived I was aghast at what I had ordered.  I didn't stop at jump rings, oh no.  Not only did I buy a bag of every color ring, I added the matching color in SCALES too.  Why not, right?  Kill me. 

OK - fast forward to a couple weeks ago when the Oriental Trading catalog showed up showcasing all the fun Halloween lamp work beads.  Add to that the boredom of working 3rd shift and we have a perfect storm. 

The good thing in all of this is I finally cracked my box from The Ring Lord, added in the stuff I got from Oriental, broke all my nails and scratched quite a few links before I got the hang of it, but....


TA DA!  The Halloween Charm bracelet is born.  The chain maille weave I used to build the chain is called a Full Persian.  It made the chunky chain I was looking for to support all these beads.  I've got Franken-finger beads, bats, eyeballs, candy corn, mummys, crystals, and a host of seed beads and rounds that I've had in the arsenal for a long, long time.  The small jump rings that attach the charms are all lime green.  The chain is made from a mixture of purple and black rings. 

It's hard to take a picture one handed.  I tried to get a shot or two of the weave.  I added in some silicone rings for stretch at the back of the bracelet.  I'm not sure I like them.  I may take them out and add a clasp.  But for now...what do you think?  Would you wear it?  I know I will...but that's me! 


And, before you ask, yes, there will also be a Chistmas version in the making. Can't wait to see the lamp work beads they have for Christmas! And, let's not forget all those scales...still have not found a use for those things.

Somebody help me. Please? :)

Happy crafting! - AMK

Tuesday, September 11, 2012

Windfall

It's back to school and back into the craft room - hooray!  That's not to say I took the summer off, mind you.  I've been hard at work on the cookie books among some other little things that you'll just have to wait to see. 

So - I was out on www.createforless.com and ordered some mini Velcro dots for use in the cookie books.  But what they sent me were these 12 foot long Velcro strips meant to be put up on the wall, with 20, 7/8th inch dots that can hold up to a 1/4 pound.  Well, obviously this is overkill for the little cookie book.  I called and let them know the problem, which they corrected immediately and to boot, they let me keep the stuff they sent in error.  Windfall!


What's a girl to do with all that Velcro tape? 

If you are like me, your craft room is nothing but little hidey-holes filled with treasures.  The biggest problem this presents is forgetting what you put away in this place or that.  Like my drawer full of embossing powders that I love, but don't use all that often.  So, I thought if I pulled them out of the drawer and put them out somewhere where I can see them, I'll play with them more often. 

In a previous post I showed you the shelf I built from bits from the local Home Depot.  I actually have two of them spanning the walls of the craft cave.  Each of the boards are 2" thick and that Velcro tape they sent me was 1.5" thick.  Sounds like a match made in heaven, right?  After running it along the edge of the wood shelf,  I stuck the round dots on the lids of the embossing powder and stuck them up!  Below you can see them running along the edge of the shelf. 

Did I mention I have 8 packages of this stuff?  I've used two.  If you don't want it, then I'll just have to find another hidey-hole for what's left. 


Wednesday, July 4, 2012

Artist's Perogative...

I added a little bling to that July 4th card.  Makes all the difference. 


And here's the last of the bunch for this year.  I stamped that grosgrain ribbon on the card with blue and then embossed over it with red powder.  The result is a nice dark purple that shows on the busy background.  I further highlighted the ribbons with some white gel pen.  The little pinwheels are some old Martha Stewart accents I've had in the arsenal for a long time.  It was time to use them up.  Hot glue a little star at the center and we've got some nice patriotic little pinwheels/flowers/star bursts.  Whatever description works for you, works for me too. 


Happy 4th everyone! We are about 10 minutes from the fireworks show here in Cedarburg.   BOOM!

Sunday, June 24, 2012

The Paper Tagger - an oldie but a goodie!

I've had a lovely week of vacation from work, which included a couple of days were it was just too damn hot in the afternoon.  On those days I made friends with the central air and set about creating July 4th cards. 

If you haven't noticed lately, one of the bigger trends in paper crafting are the use of pennants.  Strings of triangle or rectangle shaped flags to shout out your message or just to decorate the card front.   I've always liked the idea, and have several options for pennants between my stamps and die cuts.  But the thing I've not seen anyone do, which I'm surprised about, is to use the Paper Tagger to mount the pennants on your card. 

Below is the paper tagger - from Around the Block.  You can still find this tool in a starter kit, just Google it.  If you've ever bought clothes at a store (and who hasn't, right?) the price tags from the store are attached to the clothing with these little plastic tagger tails.  This tool is exactly the tool that attaches those paper tags to the clothes, only, Around the Block has made shorter tagger tails for use with paper crafting. 


Here is a card using pennants from Unity Stamp Co. I stamped them, then embossed and cut them out.  I used a 1/8th inch hole punch on each of the top corners to help the needle from the Paper Tagger easily go through all the layers, then just mounted them corner to corner across the card with the tagger. 

 
Here's one where I just floated some stars on the front with the tagger tails...The inside image is from Too Much Fun Rubber Stamps.  The background paper is from WRMK  


This shot gives you an idea of the dimension the tagger tails add.  Not to mention it gives those pennants an opportunity to act like flags in the wind. 


Happy 4th, everyone!  It's my second favorite holiday in the year.  No pressure at all, and it could not be easier to entertain the masses.  Just show up at my house around 9pm on the 4th and look up.  They shoot the fireworks off right across the street from me.  All are welcome! 

AMK

Tuesday, June 19, 2012

The Coveted 2012 Tour de France Greeting Card

Hidey-ho Readers!  There they are!  The only handmade TdF greeting cards in the world.  Only a lucky few get them.  Mostly because the rest of you think I'm nuts.  Tour season is almost upon us, truth be told, I'm having a little trouble ramping up for the event this year.  I've got 7 or 8 blog posts in my backlog for my Tour site, but I just can't seem to muster up the giddy-up.  Maybe now that the cards are done....?

Sunday, June 17, 2012

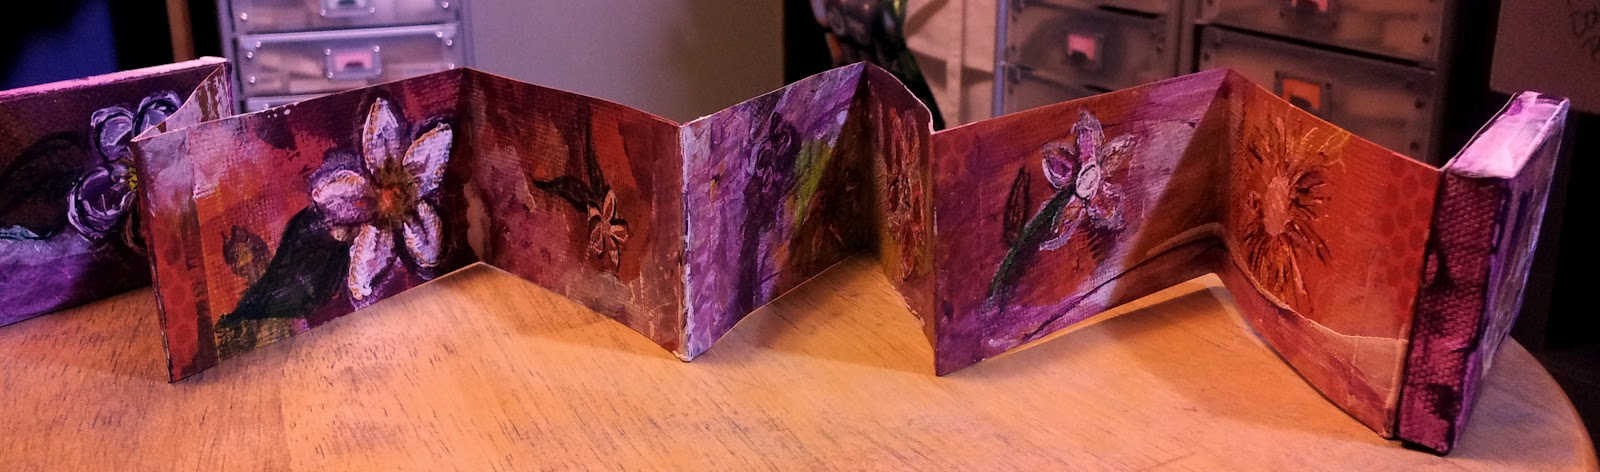
Kim's Mini-Book

A few posts ago I showed you some new paints.  It is my habit to share my postings on my Facebook page, as it seems not everyone understands how to set up RSS feeds.  My friend Kim asked me via Facebook "what are you doing with the paints?"....well....ask a silly question, get a silly little book!

I like to use my brayers.  They smear paint and ink around quickly and get things moving in the right color direction fast.  So, after starting with cutting some red scraps to make a 2x3.75" accordion, out come the brayers, pallet and, of course, my new paints. 

Next up I unearthed these not-exactly-paint-brush tools.  Essentially, these are rubber chisels in various sizes and with various angles.  They are great fun with acrylic paints as they let you push the stuff around making controlled puddles.  The tips are very flexible.  You can be as precise as you like with them.  Me, I was kind of in a slap-it-on-and-see-what-happens mood. 


One side of the accordion has her question on it.  The arrow tells you there is something more on the other side of it...


At one time in my life, I painted t-shirts to make some extra cash.  Soak the plain white T in water, layer your pallet inside and start.  I did mostly flowers, draping them down one side and over the shoulder.  Acrylics work great for this.  Just don't put your finished product in the dryer.  The stuff is plastic after all.  So with that memory in mind, I put flowers on the other side of the accordion.  The picture is not all that great, but that keeps it a bit of a surprise for Kim. 


I picked up these little 2x4 canvases at Michael's last week.  They make great book covers.  I lathered on some purple and white with the rubber chisels, and when it was dry, I sprayed it with some glimmer mist to add some sparkle.  Here's what it looks like closed and tied with a bow...


Watch your mailbox, Kim.  Love and miss you every day.  - AMK

Saturday, May 26, 2012

Cleaning up from disaster...

Ugh!  Sorry everyone.  Nothing new to post.  I've had a bit of a disaster that I am still cleaning up from.  The upstairs toilet overflowed for about 2 1/2 hours a few weeks back.  The kitchen, dining room and basement below that are a wreck.  Based on preliminary estimates, I'll be under construction for most of the summer. 

Kitchen ceiling has to come down, bathroom floor has to come up, dining room floor is a wreck but we think we can refinish rather than replace.  The built in curio cabinets in the dining room have to be sanded and refinished - hopefully minimally as it seems just the varnish bubbled up.  No electricity in the dining room and the central light in the kitchen does not work either.  And of course I have to paint everything.  Not how I wanted to spend my summer. 

I'm still headed for 4th of July cards - I refuse to let this mess up my 4th of July.  Oh!  Hey!  I was on my bike yesterday riding the Interurban to Port Washington.  They built a bike bridge over HWY 45.  I'm thinking this is an EXCELLENT place from which to watch fireworks!  See you there!

Happy Memorial Day! - AMK

Thursday, May 3, 2012

Published!

Check your local newsstand for the upcoming issue of Just Cards - Inside & Out.   Barb Housner will recognize what's on page 95, I made that one just for her last Halloween.  Page 103 has Alice's Valentine from 2010.  That's Alice, as in Wonderland...

Once again I encourage you all to send your work to magazines that you love.  All of them have some kind of editorial calendar on their websites to give you deadlines for different themes.  Or, you can do what I do.  I save my own copies of each item I make.  Then, when I have the time, I type up the recipes.  When I have a stack of a dozen or so, I just send them all in and give them permission to use them whenever they see fit.  This method keeps the surprises coming for years sometimes.  You never know how long they are going to keep your work on file for future issues.

You're not going to pay the mortgage with the proceeds, but it is a thrill to see your stuff in print. 


Tuesday, May 1, 2012

Oooooh! New Paints!

Hey crafters - don't forget about Amazon.com when hunting for craft supplies.  Amazon sells everything and can compare prices for you, to boot.  When you need to round out your shopping cart so that you get the free shipping, check out their arts and crafts department for just about anything you may have on your wish list.  I got this set of acrylic paints for next to nothing from good ol' AZ. 

The Faber Castel brush pens came from Create For Less - another great discount site.  Just be advised, they sell in BULK.  You are not getting just one sheet of paper, you're getting 12 to 25 depending on the item.  Weekly sales at an already discounted price are hard to pass up. 

I know I've not been posting newly crafted creations - it's only because I've begun the annual cookie book, so it will be a while before I can show and tell anything about that.  I'm probably skipping mother's day so if you were holding your breath, let it out.  Next up for me will be July 4th!  That is not to say I won't post anything until those are done, but that's the next big card event in my near future. 

Happy Spring!

Thursday, April 26, 2012

Spring Cleaning

Hidey-Ho, Readers,  

Sorry to have been away for a while, things are poppin’ here in the Burg, at least in my life anyway.  Work has reached a fever pitch, and on the home front, we are down to a one income couple again.  I’m not complaining.  I like to be busy, hate to be bored, and when someone else makes dinner, well, what’s better than that? 
I admit to being in a bit of creative slump.  I was counting on the Scrapbook Expo to jump start my creative noggin’ and it did not disappoint.   In preparation for what I suspected would be a large amount of new stuff, I put ‘clean the stamping room’ at the top of my to-do list.  I’m not ready to cross it off as done yet, but I’ve definitely made some in-roads. 
Below is another little idea I had as an effort to further organize my wafer thin dies.  I like to keep things out so I can see them.  It helps me remember what I have, and lets me explore all my options on a given theme.  

That piece of wood you see spanning the shelving units is a 10x12x2 plank from Home Depot.  Cheap as hell, and very sturdy.  If you wander around the lumber yard looking pathetic, you are sure to get attention from some able bodied individual to help you sling that thing into your car.  Now, those of you who know me, know that is NOT what I did, but I’ve seen it work.  I’m just sayin’… Just make sure you know how long you want it to be before you put on airs.  If you bat your eyes, that same able bodied individual will cut the thing to size for you too. 
While you’re in Home Depot, pick up a package of cup hooks and some thin metal rods.   These items should bring your grand total to something like $13.00.  Now all that’s left is to get it set up.  
If your shelving units are the same size, just toss the plank up on the highest shelf.  If they are different, like mine were, you’ll have to get out your level and jury rig one end.  (I know it looks crooked in the picture above, but it's not, it's just my crooked picture taking.  Note that it is parallel to the ceiling line.)
I used some old scraps of 2x4’s that I wrapped in polka dot paper and some old magazines as the final shim.  Once it’s level, measure your metal rods and screw three cup hooks into the underside of the plank, one on each end of the rod with about an inch of overhang and one for the middle of the rod. 
I like to organize by theme.  So, all the leaves go together, all the valentines/hearts go together, anything for winter is another one, Christmas of course and Halloween.  Then there are flourishes of all kinds, edges, geometric shapes etc, etc and on and on…  Once you have your toys grouped, it’s a simple matter to hang them on the rods. 

I use the metal clips from Simply Renee’s Clip It Up series.  But there are things back at Home Depot that would work just as well.  I just happen to have a boat load of the Clip It Up clips, so that’s what I use.  I made the white dividers from card stock, creasing the long end and labeling that, making it super easy to see where one group starts and the previous one finishes. 

This was an easy and fast solution for me.  The added bonus of a sturdy shelf for my large punches makes this a great addition to the craft cave.  And, it lets me use space, that would otherwise be unavailable.